
How to Choose the Right Chandelier Size: A Complete Guide
In brief
Above a table, start with the tabletop; without a table, use the room dimensions for a rough estimate. A 48 in round table gives a 24–32 in starting diameter. Then compare the complete fixture outline, hanging height and a full-size paper pattern before ordering.

Key takeaways
- 48 in round table: compare 24–32 in fixture diameters as a starting point.
- 72 in long table: Kichler’s guideline gives 24–36 in linear lengths; check width separately.
- 12 × 14 ft room without a table: rough starting diameter 26 in.
- Tall foyers and stairs: compare the opening and views; check hanging height separately.
- Before ordering: confirm complete dimensions and try a full-size paper outline.
What should you measure first?
Start with the surface or space below the light. Above a dining table or kitchen island, measure the tabletop or countertop. In a room without a table, measure the area the chandelier will serve.
Then check the fixture’s complete dimensions, including its shades, arms and projecting details:
- Diameter: the full width across a round fixture.
- Length: the long dimension of an elongated fixture.
- Width: its shorter dimension.

Keep these measurements beside you while comparing products. Already have your numbers? Try the size calculator or use the worked examples below to turn them into a shortlist.
Chandelier size recommendations by room
Find your space first. The right measurement depends on what the light sits above and how you use the room.
| Room | Measure first | Check next |
|---|---|---|
| Dining room | Table diameter, or length and width | Round or linear fixture |
| Kitchen island | Countertop length and width | One fixture or several pendants |
| Living room | Room or seating area | The area the light serves |
| Bedroom | Room and bed position | Bedside movement and fixture height |
| Entryway | Entry area and door position | Full fixture outline |
| Tall foyer or stairs | Opening and surrounding layout | Views and walking positions |
| Hallway | Width and lighting layout | One light or several |
Dining rooms: start with the table
Round tables
For an initial comparison, try a chandelier diameter around one-half to two-thirds of the table diameter, a proportion described in Artcraft’s dining-room guide. Use it to narrow your options before comparing individual designs.
For a 48-inch round table:
48 × ½ = 24 inches
48 × ⅔ = 32 inches
Begin by comparing fixtures around 24–32 inches wide.

| Round table diameter | Starting chandelier diameter |
|---|---|
| 42 in | 21–28 in |
| 48 in | 24–32 in |
| 54 in | 27–36 in |
| 60 in | 30–40 in |
| 72 in | 36–48 in |
These are calculated starting ranges. A fixture outside the range may still suit the room, depending on its shape and how substantial it looks.
Long and rectangular tables
Choose the fixture shape before using the measurements. For a round chandelier, compare its diameter with the table’s shorter side. For a linear chandelier, compare length with length, then inspect width separately.
Here is how that changes the shortlist for a 72 × 36-inch table:
- Round fixture: using the 36-inch width gives 18–24 inches in diameter.
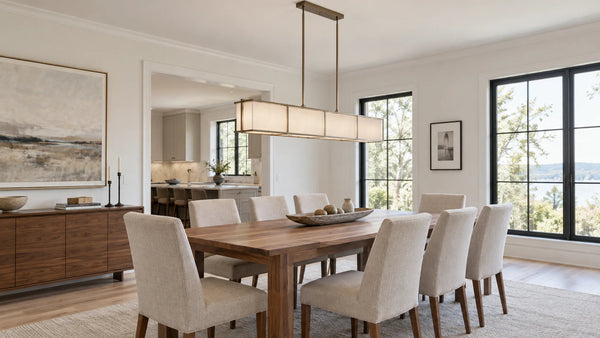
- Linear fixture: Kichler’s one-third to one-half guideline gives 24–36 inches in length.
Use this manufacturer guideline as an initial comparison, then check the complete width and appearance. The 40-inch fixture illustrated below is a separate footprint example, outside this starting range; it is not a recommended size for every 72-inch table.

For an oval table, also check the narrowing ends. A fixture’s rectangular dimensions alone will not show how its outline relates to the curved tabletop. For a closer length-and-width comparison, see our linear chandelier size guide.
For the full dining-room decision—including shape, extendable tables and seated comfort—see our dining room chandelier guide.
Kitchen islands: separate size from spacing
First decide whether you want one linear fixture or several separate pendants.
For one linear fixture, compare its full length and width with the countertop. Check where you prepare food or sit, and sketch the space left at both ends. A dining-table proportion alone does not decide an island layout.
For several pendants, write down the number of lights and each shade’s diameter. For pendants centered beneath their suspension points, center-to-center spacing and the open gap between shades are different measurements. Treat the whole arrangement as a separate layout decision. Our Kitchen Island Lighting Guide compares two larger pendants with three smaller ones using the same island dimensions.
Compare island chandeliers once you have measured your countertop.
Living rooms: size the area the light serves
For a regular room with one roughly round chandelier, the room-size rule can provide an initial diameter:
Room length in feet + room width in feet → starting diameter in inches
A 12 × 14-foot room gives 12 + 14 = 26, or roughly 26 inches (66 cm) across. Kichler describes this sizing method; here, the result is a starting point for comparison.

In an open-plan home, identify the seating area the light will serve. Using the dimensions of the entire connected floor can produce an unhelpful result. If that area has no clear boundaries, compare a few fixture outlines within your furniture layout. For furniture placement, fixture appearance and the view from the sofa, see our living room chandelier guide.
Bedrooms: check the room and the bed layout
Use the room estimate to begin, then compare the chandelier’s position with the bed.
Picture ordinary movements: walking beside the bed, sitting up, standing and making the bed. The fixture’s height and projecting arms matter alongside its diameter. A bed-size label such as “king” does not describe all those conditions.
For the vertical measurements and activity checks, see How High to Hang a Chandelier. A dining-table gap should not be transferred to the space above a mattress.
Entryways: compare the fixture with the whole layout
Measure the entry area and note the door’s position. A square entry and a narrow passage can have similar floor areas but very different shapes.
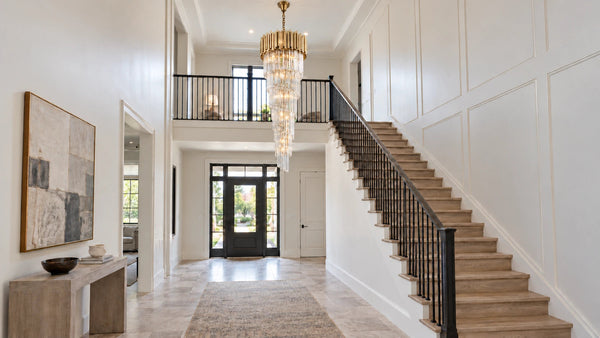
Compare the full fixture outline with that layout, including where doors open. Check the product’s body height and available hanging length before choosing a wider or taller version. A photograph taken in a large foyer can make a substantial fixture look surprisingly compact.
Tall foyers and stairs: measure the open space
Record the opening where the fixture will hang, then compare the chandelier’s full width, length and body height.

Look from downstairs, the landing and upstairs. Note where the fixture would overlap a railing or occupy a view you want to keep open.
Also mark every walking position affected by the proposed location. A light that appears centered in the opening still needs a separate hanging-height check. See the height guide for how different walking surfaces change the available clearance.
Use those measurements when comparing staircase chandeliers.
Hallways: consider the lighting layout first
Decide whether one fixture will serve a compact section or several lights will run along the hall. Then compare the width, door positions and complete fixture dimensions.
Avoid feeding the length of a long, narrow corridor straight into the room formula. Sketch the planned light positions first, so each candidate is judged in the part of the hallway it will occupy.
Try the size calculator
Use the starting range to compare candidates, then check the complete fixture dimensions and hanging height. Tabletop space is measured in plan; it does not establish installation suitability.
Select your layout and use the calculator’s example before entering your measurements. For a room measured in meters, the calculator converts to feet, applies the room rule, then converts the result to centimeters.
Linear fixture and tabletop space
Suppose you are considering a 40 × 10-inch fixture, centered above a 72 × 36-inch rectangular table. Looking down from above:
Space at each end = (72 − 40) ÷ 2 = 16 inches
Space at each side = (36 − 10) ÷ 2 = 13 inches
These calculations assume a rectangular table and fixture outline, with the fixture centered above the table. Subtract the fixture dimension from the matching table dimension, then divide by two. This describes tabletop space in plan; hanging height needs its own check.
If your table or light has a curved or irregular outline, use a paper pattern to inspect the actual shape.
Between two sizes? Compare how the light looks
Put the two product dimension drawings side by side. Look beyond the single diameter listed in a product title.

An open frame may allow you to see through much of the fixture. A dense arrangement of shades or crystals can occupy more of the same view. This apparent heaviness is often called visual weight.
Ask which effect you want at the table: a lighter outline or a more substantial focal point.
| Compare | What to look for |
|---|---|
| Full width and length | Arms and shades beyond the central frame |
| Body height | How much vertical space the design occupies |
| Shape from the side | What you see when seated and standing |
| Lighting information | Output, bulb options and dimming for that model |
A larger diameter alone does not tell you how much light a product provides. Read the specifications for the exact version you are considering.
Check your shortlist before ordering
Make a simple paper outline of your preferred size. For a round fixture, mark its diameter. For a linear fixture, mark its full length and width.

Place it where the chandelier would be centered. Compare it with the table edges, then look from your usual seats and the room entrance. Try the other candidate size if the first seems too dominant or too slight.
The paper pattern shows the outline from above. You still need to check the suspended fixture’s height and how it will appear at eye level.
Before ordering, confirm:
- Complete dimensions: do they include the shades, arms and decorative details?
- Body height and overall drop: how tall is the fixture itself, and what ceiling-to-bottom lengths can its supplied assembly achieve?
- Installation details: does the selected model suit the intended ceiling and mounting arrangement?
- Lighting and accessories: what light source, dimming options and components come with your chosen version?
Keep a copy of the dimension drawing for that version. Similar-looking variants can have different proportions and hanging assemblies.
FAQs
What if my dining table extends?
Measure both everyday and extended configurations. Compare your candidate with each, then decide which arrangement you use most often. A paper outline makes that comparison easier. If the table changes substantially, also consider how the ends will be lit when extended.
What if I am between two available sizes?
Compare both full-size outlines and the body heights. See the visual-weight comparison above; the larger version is not automatically the better choice.
Can I use two chandeliers over one long table?
Two fixtures can be a layout option. Sketch both complete outlines and their proposed positions over the table before selecting sizes. Simply halving a single-fixture recommendation does not account for the gap between them, their shapes or where their mounting points need to be.
What if the room rule and table rule give different answers?
For a chandelier above a table, use the tabletop to establish your initial comparison, then step back and judge it within the room. The methods consider different things. A result that suits the table still needs a check against the fixture’s overall appearance and available height.
What if the product page does not show the full dimensions?
Ask for a dimension drawing for the exact size or variant. Confirm whether the listed width includes shades and arms, and request the body height and available overall hanging lengths. Avoid estimating dimensions from a styled photograph, where perspective can change apparent scale.
Sources and illustration notes
- Artcraft: Dining-room chandelier sizing — table-width proportions and comparing fixture appearance.
- Kichler: Chandelier planning and selecting tips — room-size estimation and the one-third to one-half table-length guideline used here.
Images are editorial illustrations, not verified store products or customer installations. Diagrams and numerical examples explain the stated methods. Check your layout and the chosen fixture’s specifications before ordering.

Back to Ultimativer Leitfaden zur Auswahl des perfekten Kronleuchters für Ihr Zuhause
Comments
Have a question or a useful tip? Leave a comment below.